
How to Deploy qBittorrent: Headless BitTorrent Client with Web UI and Docker Compose
qBittorrent is an ad-free, high-performance BitTorrent client powered by Qt 6 and libtorrent. Learn how to deploy the headless qBittorrent daemon using Docker Compose, pre-seed deterministic owner credentials, configure speed caps, and manage torrent swarms through the Web UI.
qBittorrent is a mature, high-performance, open-source BitTorrent client programmed in C++ using the Qt 6 framework and Arvid Norberg's libtorrent-rasterbar engine. Licensed under the GNU General Public License v2.0 or later (GPL-2.0-or-later) with an OpenSSL exception, qBittorrent was developed to provide a reliable, ad-free alternative to proprietary torrent clients like µTorrent and BitTorrent Classic. While qBittorrent is widely recognized as a cross-platform desktop application, its headless execution daemon—qbittorrent-nox—embeds a lightweight HTTP server that delivers an interactive Web UI alongside an extensive REST API (WebAPI v2). This architecture makes qBittorrent an essential pillar of modern homelabs, media servers, and automated download stacks.
When running headless on a server, NAS, or inside a container, qBittorrent runs unattended with minimal memory overhead while maintaining full protocol compliance. It natively handles BitTorrent v1 and modern BitTorrent v2 (BEP 52) protocols with Merkle tree data verification, Distributed Hash Table (DHT), Peer Exchange (PeX), Local Peer Discovery (LSD), full connection encryption, and sequential downloading. Furthermore, qBittorrent's built-in WebAPI v2 allows seamless synchronization with media automation suites such as Prowlarr, Sonarr, Radarr, Lidarr, and Autobrr, as well as alternative web frontends like VueTorrent and Flood.
Core Capabilities and Architecture
- Headless Daemon (
qbittorrent-nox): Operates without X11 or Wayland display server dependencies (-DGUI=OFF). It hosts a complete web-based replica of the desktop interface alongside an authenticated REST API. - Robust BitTorrent Core (
libtorrent-rasterbar): Handles high-throughput swarms, queueing algorithms, per-torrent and global speed scheduling, super-seeding, and FastResume state persistence backed by an SQLite engine with Write-Ahead Logging (WAL). - Advanced Interface Binding & Kill Switch: Binds traffic directly to a specific physical or virtual network interface (such as
wg0,tun0, ortailscale0), acting as a fail-safe kill switch to prevent IP address leakage if a VPN tunnel drops. - Automated RSS Manager: Downloads new releases automatically using flexible regular expression filters, title regex parsers, and smart episode matching.
- Granular Categorization and Auto TMM: Directs files into specific storage destinations automatically based on user-defined categories (e.g.,
linux-isos), complete with per-category tags and path structures. - Ecosystem REST API (WebAPI v2): Enables remote control, script orchestration, and automated pipeline integration through clean JSON endpoints under
/api/v2/.
---
Prerequisites
Before starting the deployment, verify that your host environment meets the following requirements:
- Operating System: Any modern Linux distribution (Ubuntu 22.04/24.04 LTS, Debian 12+, Rocky Linux, Arch Linux) or macOS/Windows running Docker Desktop / WSL2.
- Container Runtime: Docker Engine 20.10+ with Docker Compose v2 (
docker compose versionv2.24+ recommended). - Hardware Resources:
- CPU: 1 to 2 vCPU cores. qBittorrent is lightweight in idle states, with CPU utilization scaling during disk hash checks and multi-gigabit swarm transfers. - Memory: 512 MB RAM minimum; 1 GB to 2 GB recommended for high-connection limits or active multi-gigabyte torrent queues. - Storage: Storage volume space sized for your expected download workload (e.g., Linux ISOs, media archives), formatted as ext4, Btrfs, or ZFS.
- Network Ports:
- Web UI & REST API: Host port 3000 (or default 8080), TCP. - BitTorrent Peer Traffic: Host port 6881, both TCP and UDP. For optimal peer connectivity, this port should be forwarded in your firewall/router.
- Permissions: A dedicated non-root user ID and Group ID (
PUID=1000,PGID=1000) to guarantee correct file ownership across persistent host mounts.
---
Exact Install Steps
Because the upstream qBittorrent repository maintains C++ source code without an official in-tree Compose file, we deploy the containerized qbittorrent-nox daemon using the industry-standard LinuxServer.io image (lscr.io/linuxserver/qbittorrent:latest). This container packages qBittorrent v5.3.0, handles user permissions automatically, and exposes clean persistent storage paths.
Step 1: Create Staging Directory Structure
Create an isolated directory structure for your qBittorrent deployment. This keeps your configuration and active download directories separate from host system files:
mkdir -p qbittorrent/config/qBittorrent qbittorrent/downloads
cd qbittorrent
Step 2: Configure Environment Variables (.env)
Create a .env file to define the project parameters, container port mappings, and user permission identifiers. In this configuration, we expose the Web UI on host port 3000 (mapped to internal container port 8080) and peer traffic on port 6881:
cat > .env <<'EOF'
COMPOSE_PROJECT_NAME=qbittorrent
PORT=3000
PEER_PORT=6881
PUID=1000
PGID=1000
TZ=Etc/UTC
WEBUI_PORT=8080
EOF

chmod 600 .env
Step 3: Pre-seed Owner Credentials (qBittorrent.conf)
Starting in qBittorrent v5, upstream removed default hardcoded credentials (the historic admin/adminadmin) to safeguard against unauthorized internet-facing installations. On a fresh start, qBittorrent now generates a randomized, temporary password printed to stdout.
To achieve a deterministic, automated setup without hunting through container logs, pre-seed qBittorrent.conf with a PBKDF2-SHA512 password hash. qBittorrent stores the hash in the format @ByteArray(<base64_salt>:<base64_pbkdf2_sha512_hash>) using 100,000 iterations and a 64-byte key length.
Generate the hash using Python and write the initial configuration file:
# Set your desired administrator credentials
ADMIN_USER="admin"
ADMIN_PASS="ShortformDemo-2026!"

# Compute PBKDF2-SHA512 password hash matching qBittorrent's internal format
HASH=$(python3 -I -c "
import hashlib, os, base64, sys
salt = os.urandom(16)
key = hashlib.pbkdf2_hmac('sha512', sys.argv[1].encode('utf-8'), salt, 100000, 64)
print(base64.b64encode(salt).decode() + ':' + base64.b64encode(key).decode())
" "$ADMIN_PASS")

# Write configuration with pre-seeded authentication
cat > config/qBittorrent/qBittorrent.conf <<EOF
[LegalNotice]
Accepted=true

[BitTorrent]
Session\DefaultSavePath=/downloads/
Session\Port=6881
Session\TempPath=/downloads/incomplete/

[Preferences]
Connection\UPnP=false
General\Locale=en
WebUI\Port=8080
WebUI\Username=${ADMIN_USER}
WebUI\Password_PBKDF2="@ByteArray(${HASH})"
WebUI\LocalHostAuth=true
WebUI\AuthSubnetWhitelistEnabled=false
WebUI\HostHeaderValidation=false
WebUI\CSRFProtection=true
EOF

chmod 600 config/qBittorrent/qBittorrent.conf
[!TIP]
Alternative Setup: If you prefer not to generate a PBKDF2 hash beforehand, you can omit theWebUI\Password_PBKDF2line. On first boot, retrieve the temporary password withdocker compose logs | grep -i "temporary password", log in, and set a permanent password under Tools > Options > Web UI.
Step 4: Create Docker Compose Configuration (compose.yml)
Write the compose.yml file. This specifies the official LinuxServer.io image, mounts your local configuration and download directories, maps the Web UI and peer ports, and defines a robust container healthcheck:
cat > compose.yml <<'EOF'
services:
  qbittorrent:
    container_name: ${COMPOSE_PROJECT_NAME}-app
    image: lscr.io/linuxserver/qbittorrent:latest
    restart: unless-stopped
    ports:
      - "${PORT}:8080"
      - "${PEER_PORT}:6881"
      - "${PEER_PORT}:6881/udp"
    environment:
      - PUID=${PUID}
      - PGID=${PGID}
      - TZ=${TZ}
      - WEBUI_PORT=8080
      - TORRENTING_PORT=6881
    volumes:
      - ./config:/config
      - ./downloads:/downloads
    healthcheck:
      test: ["CMD-SHELL", "curl -fsS http://127.0.0.1:8080/api/v2/app/version -o /dev/null -w '%{http_code}' | grep -qE '200|403'"]
      interval: 10s
      timeout: 5s
      retries: 12
      start_period: 15s
    networks:
      - qbt

networks:
  qbt:
    name: ${COMPOSE_PROJECT_NAME}-net
EOF
[!NOTE]
The healthcheck testshttp://127.0.0.1:8080/api/v2/app/versionand accepts HTTP200or403. When authentication is enabled, anonymous calls to the WebAPI return403 Forbidden, which verifies that the web service is responsive and actively guarding requests.
Step 5: Start the Container Stack
Launch qBittorrent in detached mode using Docker Compose:
docker compose pull -q
docker compose up -d
Check the startup progress and confirm the container reaches a healthy state:
docker compose ps
docker compose logs -f qbittorrent
Once the container logs display [custom-init] ... qBittorrent-nox started, the Web UI is ready to accept connections.
---
Browser Setup
Once the container is healthy, navigate to the Web UI in your browser at http://<your-host-ip>:3000 (or http://localhost:3000).
1. Authenticate with Administrator Credentials
The browser will display the standard qBittorrent login dialog.
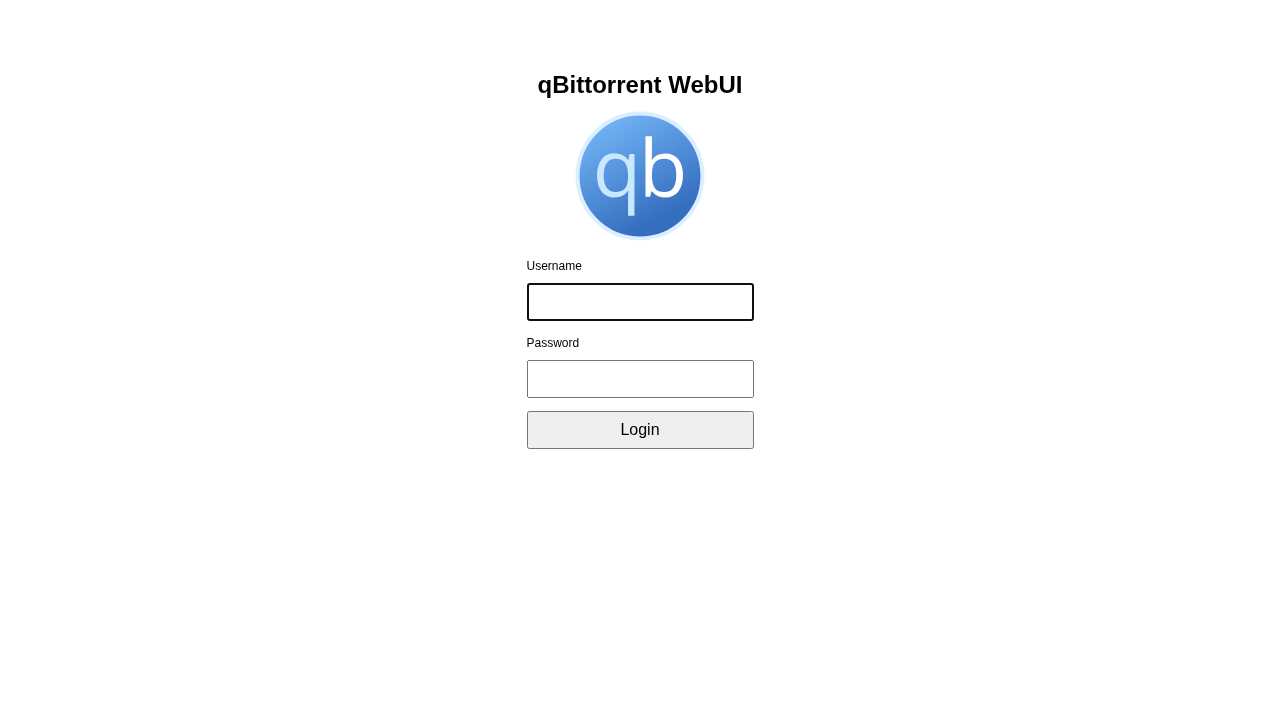
Enter the configured username (admin) and password (ShortformDemo-2026!, or the credentials you configured in Step 3).
[!WARNING]
qBittorrent includes built-in brute-force protection. By default, 5 consecutive failed login attempts will ban the originating IP address for 3,600 seconds (1 hour). Ensure credentials are correct before submitting.
2. The Transfers Dashboard
After authentication, qBittorrent loads the full desktop-class MochaUI workspace directly inside the browser.
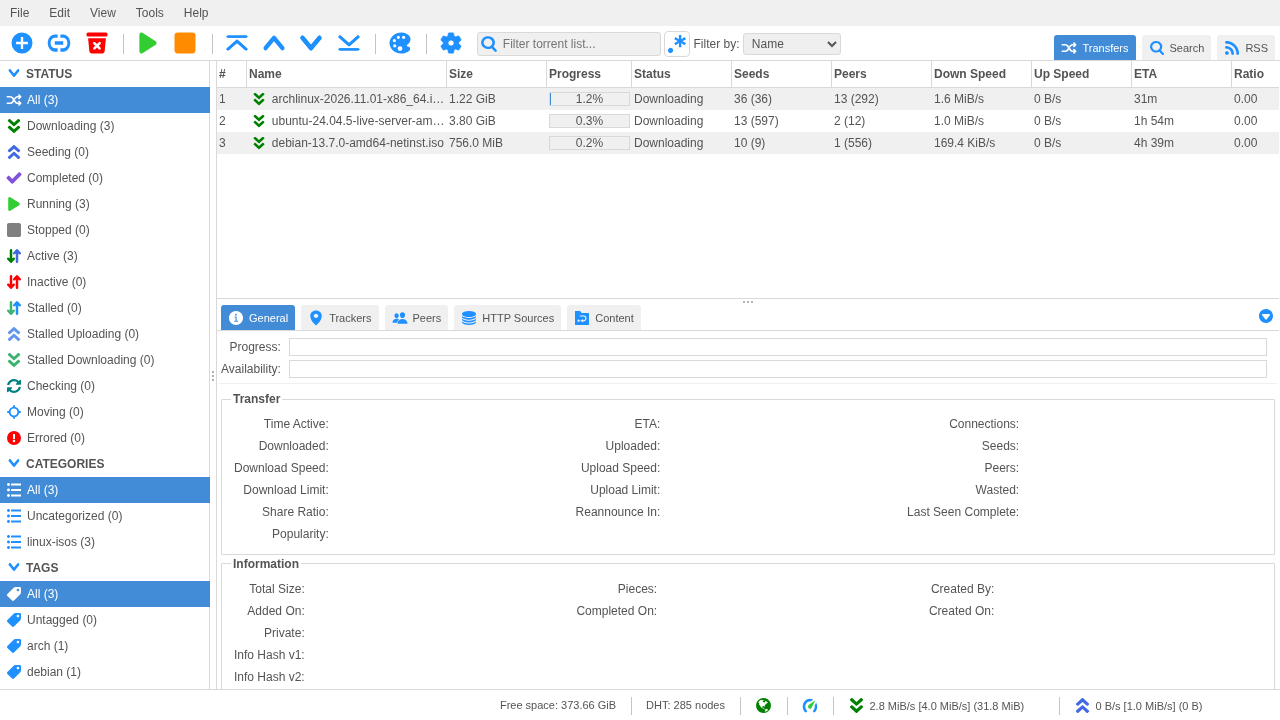
The dashboard provides immediate visibility into your torrent queue:
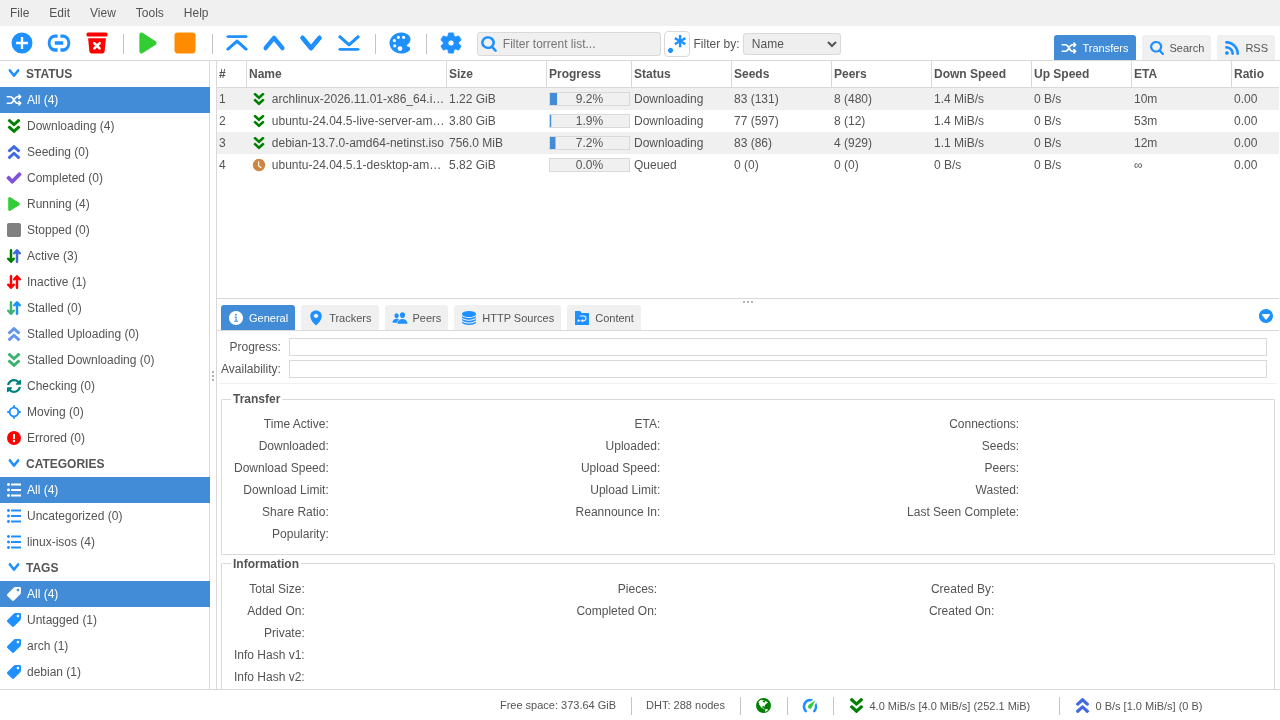
- Top Toolbar: Controls for starting, pausing, deleting, and prioritizing torrents, plus the Add Torrent Link and Add Torrent File actions.
- Left Sidebar: Filters by transfer status (*All*, *Downloading*, *Seeding*, *Completed*, *Paused*), categories, and user tags.
- Central Pane: Live table displaying name, size, download progress percentage, transfer speeds, seed counts, and swarm leechers.
- Bottom Status Bar: Global download/upload rates, connection health, and DHT node counts.
3. Adding Torrents via Magnet Link or URL
Click the Add Torrent Link icon (the link symbol on the top toolbar) to open the download input window.
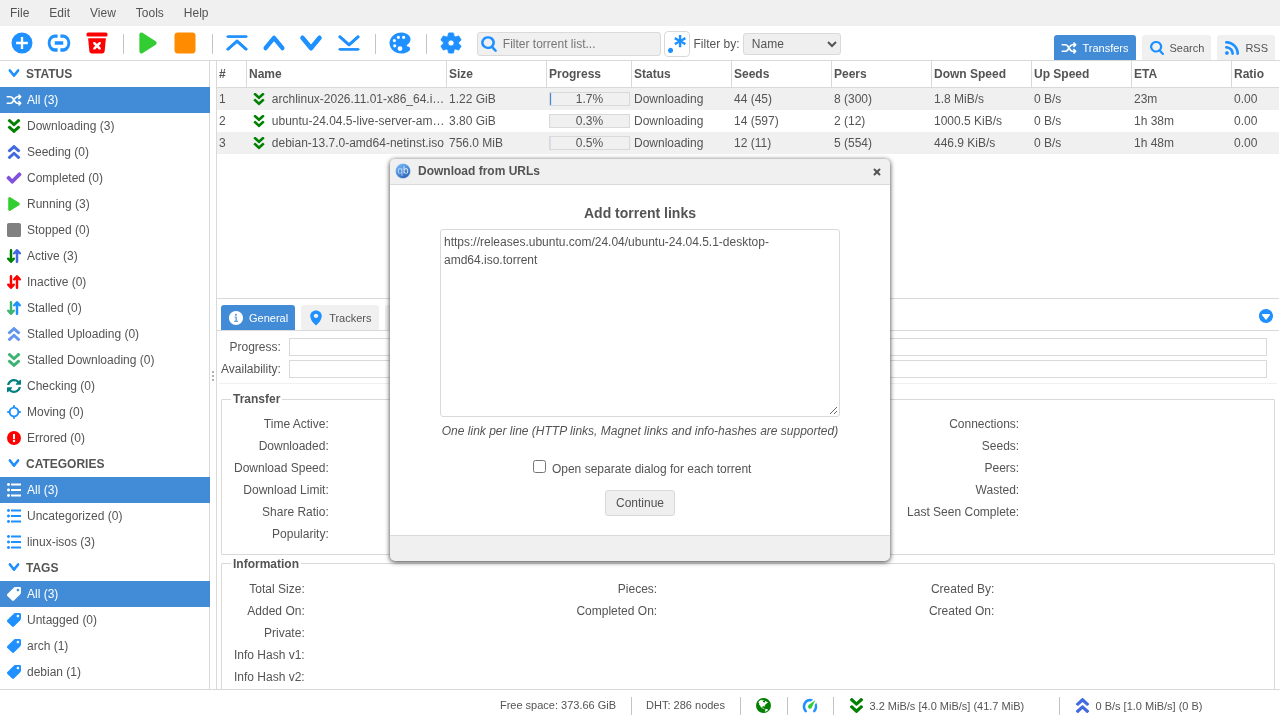
Paste a legal .torrent URL or Magnet link into the URL field. For example, to download the official Ubuntu desktop distribution:
https://releases.ubuntu.com/24.04/ubuntu-24.04.5.1-desktop-amd64.iso.torrentClick Download or Continue. The client fetches metadata from the swarm and presents the detailed torrent options dialog.
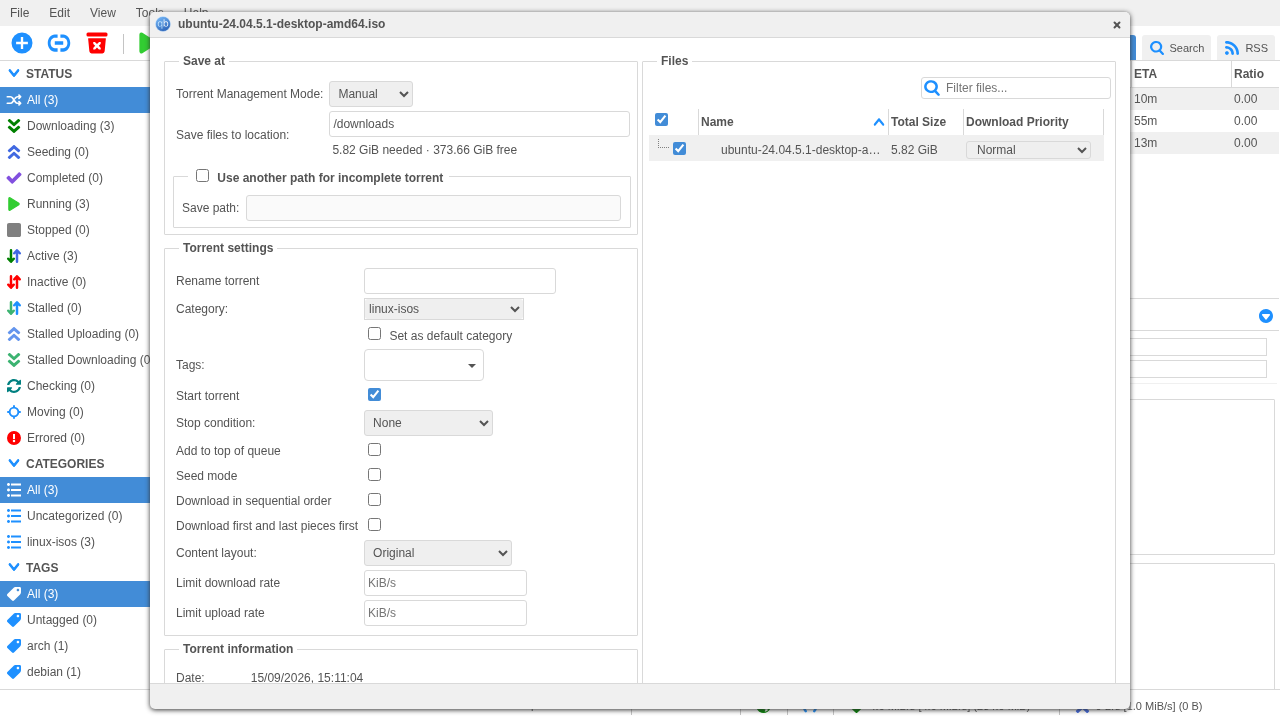
In this dialog, you can:
- Assign a Category (such as
linux-isos), which automatically maps the save destination to/downloads/linux-isos/. - Specify user Tags (e.g.
ubuntu,demo). - Select individual files inside multi-file torrents.
- Choose whether to start the download immediately.
Click Download to confirm. The new torrent appears immediately in the active transfers table.
4. Categorization and Status Filtering
To filter down high-volume queues, click the Downloading status filter and the linux-isos category in the left sidebar.
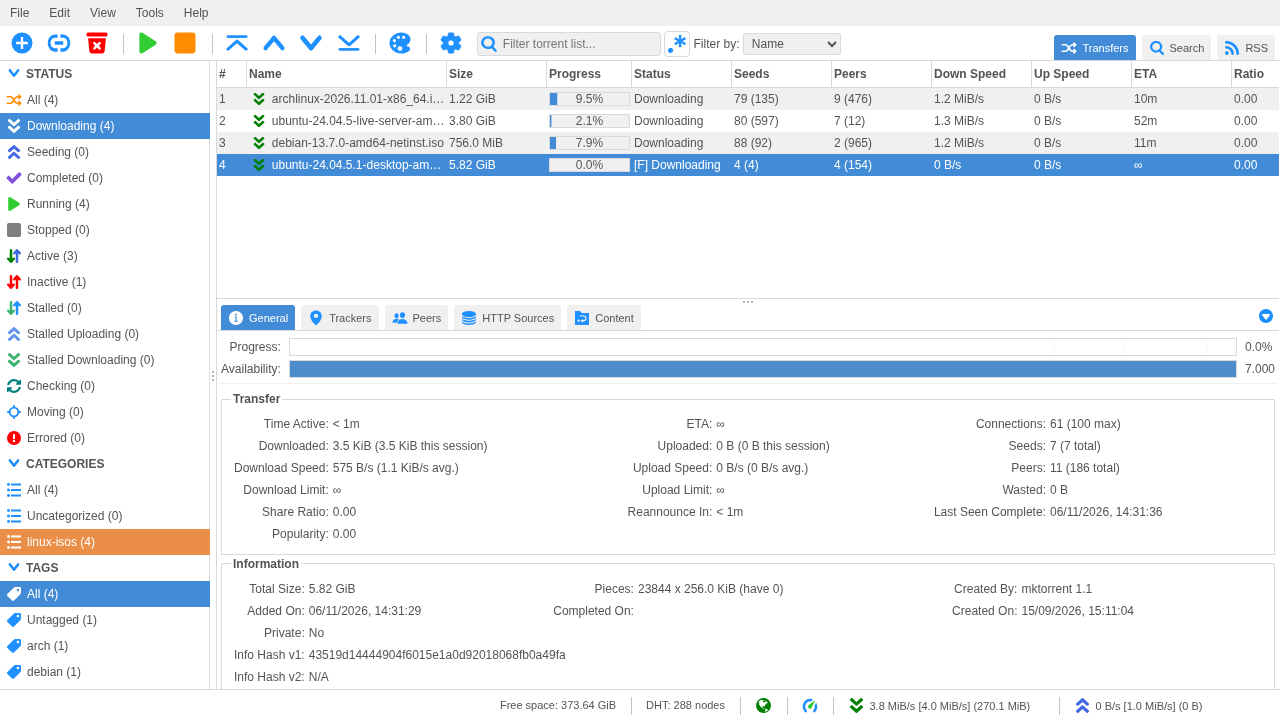
qBittorrent isolates the view to matching transfers. Right-clicking any torrent row exposes advanced actions, including Force Start (bypassing global queue limits), sequential downloading options, and bandwidth throttling limits.
5. Automated RSS Feed Subscriptions
Click the RSS tab at the top of the interface to manage automated syndication feeds.
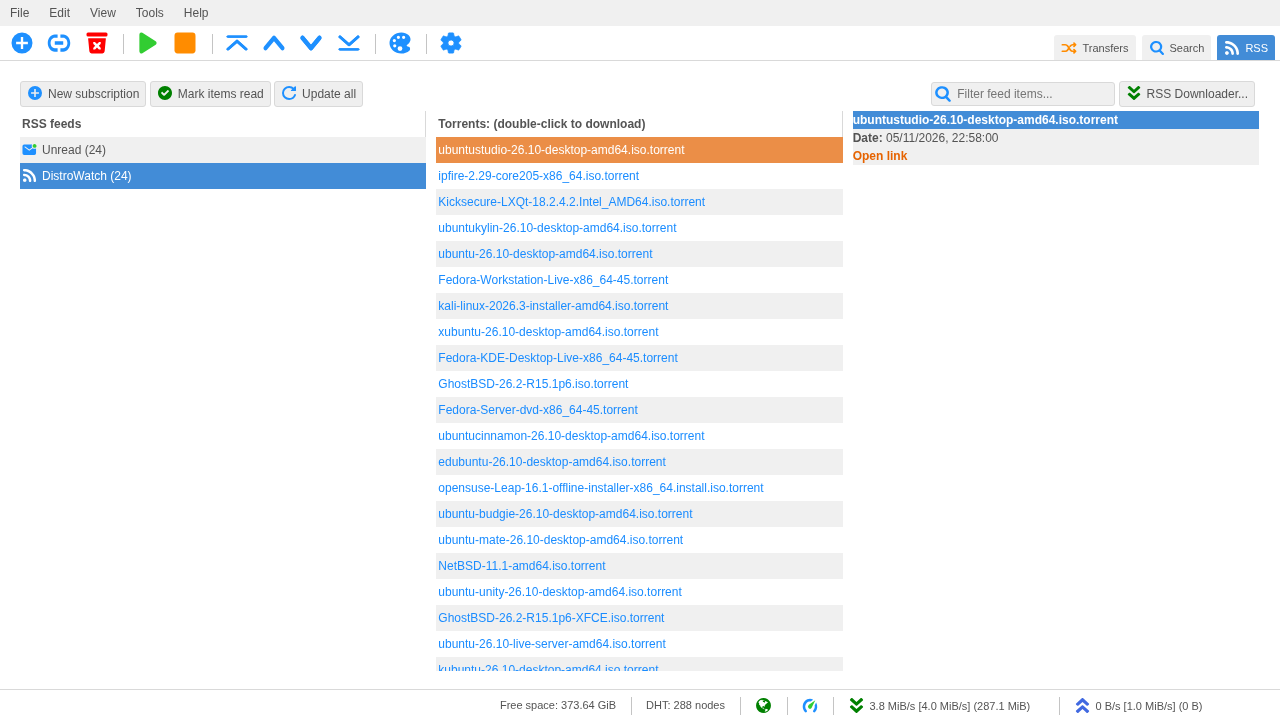
Click New Subscription, enter the feed URL (such as the official DistroWatch torrent feed at https://distrowatch.com/news/torrents.xml), and click OK. You can inspect newly indexed items directly or click RSS Downloader to configure regex-based automated grab rules based on release names and quality profiles.
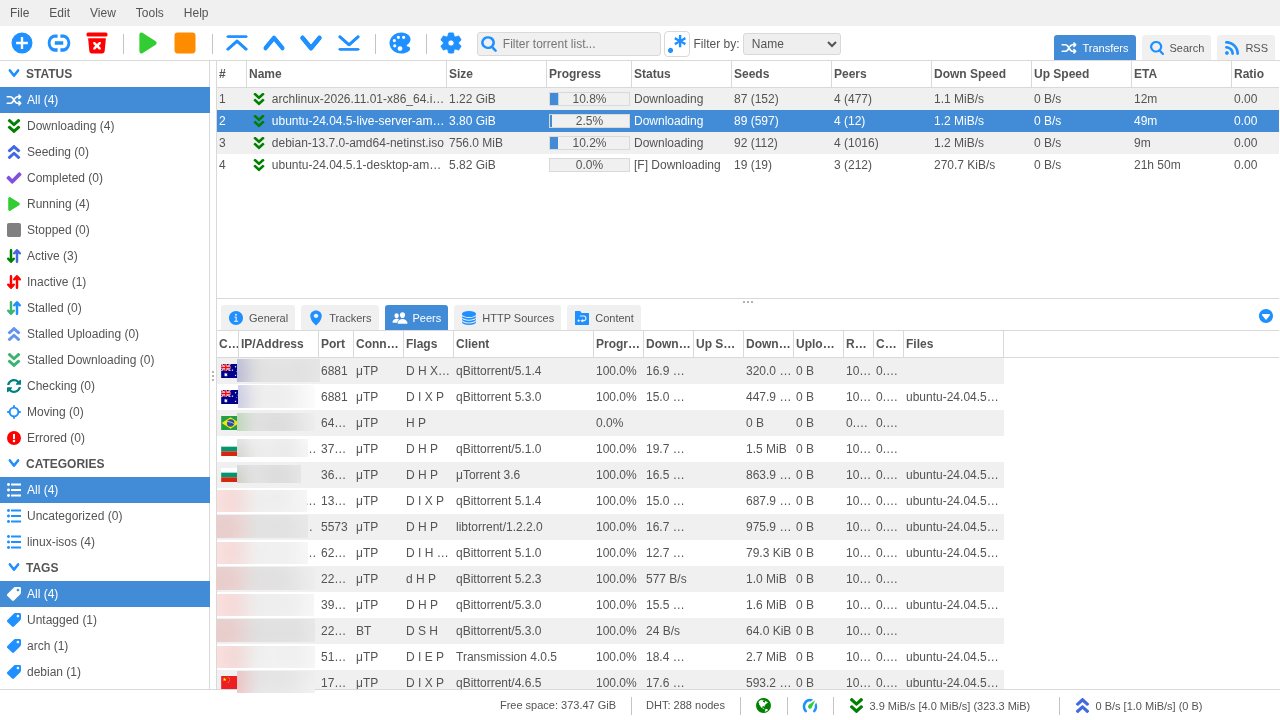
6. Inspecting Swarms, Bandwidth, and Peers
Select any active transfer in the Transfers tab and open the Peers panel in the bottom details pane.
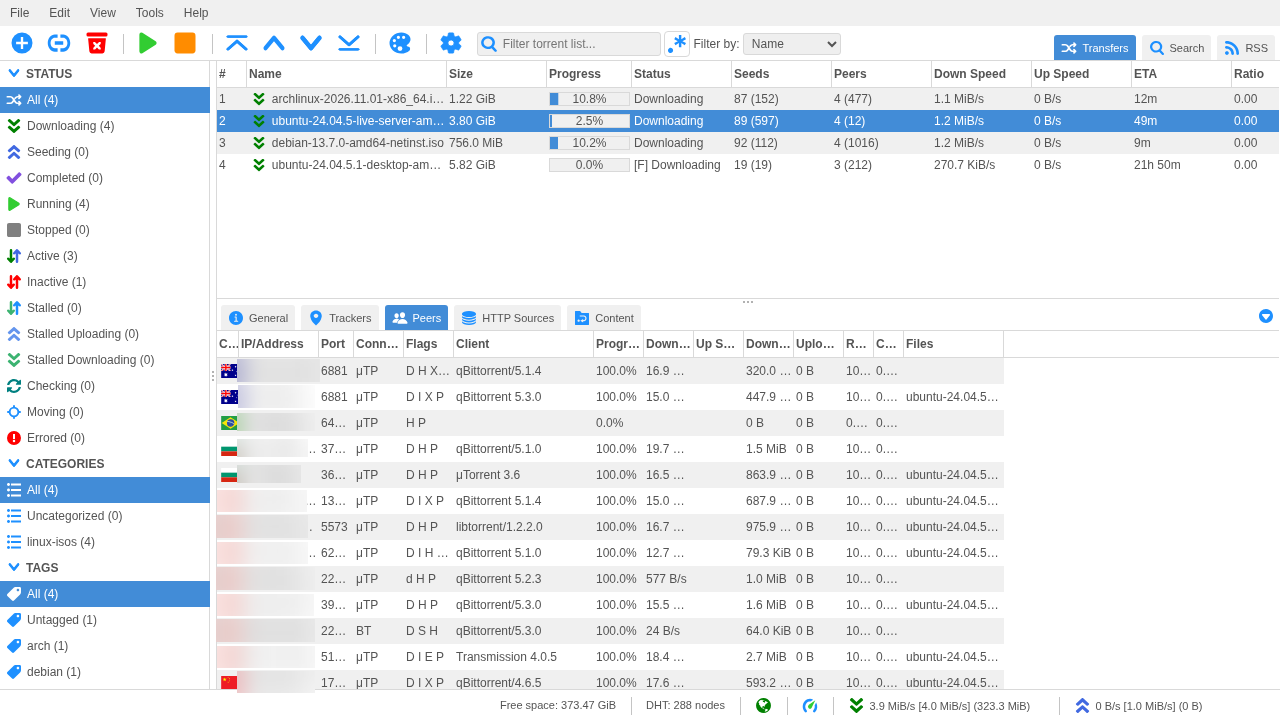
The panel displays real-time BitTorrent swarm dynamics:
- Connected peer IP addresses and country flags (resolved via the embedded DB-IP database).
- Client software identifiers (e.g.,
libtorrent/1.2.19,qBittorrent/5.0.0). - Individual download and upload transfer rates per peer.
- The bottom status bar shows the live DHT status (e.g.,
DHT: 288 nodes) and aggregate bandwidth throughput adhering to your configured bandwidth limits.
---
Verification
To verify that qBittorrent is operating correctly and ready for automated integration, run these diagnostic checks from your terminal.
1. Inspect Docker Container Health
Confirm the container status and port bindings:
docker compose psExpected output:
NAME                                  IMAGE                                  COMMAND   SERVICE       CREATED          STATUS                    PORTS
qbittorrent-app                       lscr.io/linuxserver/qbittorrent:latest "/init"   qbittorrent   20 seconds ago   Up 20 seconds (healthy)   0.0.0.0:3000->8080/tcp, 0.0.0.0:6881->6881/tcp, 0.0.0.0:6881->6881/udp
2. Verify Application Version Inside Container
Run the compiled headless binary inside the container to verify the installed version:
docker exec qbittorrent-app /app/qbittorrent-nox --versionExpected output:
qBittorrent v5.3.03. Programmatic API Verification (WebAPI v2)
qBittorrent provides a comprehensive REST API under /api/v2/. Use curl with cookie storage to authenticate and query application state:
# 1. Log in and capture session cookie (HTTP 204 expected)
curl -s -c jar -X POST http://localhost:3000/api/v2/auth/login \
  -H "Referer: http://localhost:3000" \
  --data-urlencode "username=admin" \
  --data-urlencode "password=ShortformDemo-2026!" \
  -o /dev/null -w "Login response: HTTP %{http_code}\n"

# 2. Query application version and WebAPI revision
curl -s -b jar -H "Referer: http://localhost:3000" http://localhost:3000/api/v2/app/version
echo
curl -s -b jar -H "Referer: http://localhost:3000" http://localhost:3000/api/v2/app/webapiVersion
echo

# 3. Inspect library build dependencies
curl -s -b jar -H "Referer: http://localhost:3000" http://localhost:3000/api/v2/app/buildInfo
echo

# 4. Check active transfer statistics and DHT nodes
curl -s -b jar -H "Referer: http://localhost:3000" http://localhost:3000/api/v2/transfer/info
echo

# Clean up temporary cookie jar
rm -f jar
Expected response values:
- Login returns
HTTP 204(No Content) with a validSIDsession cookie. - App version:
v5.3.0. - WebAPI version:
2.16.2. - Build info confirms runtime compilation with Qt 6,
libtorrent-rasterbar2.x, Boost, and OpenSSL. - Transfer metrics confirm
connection_status: "connected"with active DHT nodes.
---
Troubleshooting
The table below outlines common deployment issues, root causes, and verified solutions:
| Symptom | Probable Cause | Solution |
|---|---|---|
| HTTP 401 Unauthorized or IP address blocked | Failed login attempts exceeded threshold (default 5 attempts triggers an IP ban for 3600 seconds) | Wait for the 1-hour ban window to expire, or stop the container and edit config/qBittorrent/qBittorrent.conf to clear banned IP entries or set WebUI\BanDuration=0. Restart the container. |
| Temporary password not found in container logs | A pre-seeded qBittorrent.conf file was already detected, bypassing temporary password generation | When pre-seeding credentials via WebUI\Password_PBKDF2, use your specified password directly. Temporary passwords are only generated when qBittorrent.conf lacks password configuration. |
Port binding failure (address already in use: 3000 or 6881) | Another service is bound to host port 3000 or peer port 6881 | Edit .env and change PORT to an unused port (such as 8080, 8085, or 3002) and PEER_PORT to 6882. Run docker compose up -d to rebind. |
| Stalled downloads or 0 connected swarm peers | Inbound peer port 6881 (TCP and UDP) is blocked by a host firewall or NAT router | Forward port 6881 TCP/UDP on your router to the host machine. Ensure host firewalls (e.g. ufw allow 6881/tcp && ufw allow 6881/udp) allow peer traffic. Verify DHT is enabled. |
Permission denied errors writing to /downloads | Host volume directory ownership does not match container process user ID (PUID) | Ensure ./downloads on the host is owned by the user ID matching PUID=1000. Run sudo chown -R 1000:1000 config downloads on the host. |
| Container healthcheck reports unhealthy | Healthcheck command does not permit HTTP 403 response codes | When authentication is enabled, querying /api/v2/app/version without a cookie returns HTTP 403. Ensure the healthcheck rule uses `grep -qE '200\ |
| Web UI displays a blank white screen or CSRF error | Accessing via reverse proxy or IP with Host header validation active | Ensure WebUI\HostHeaderValidation=false is set in qBittorrent.conf or add your domain name to WebUI\ServerDomains. |
---
Assumptions & Decisions
- Deterministic Owner Authentication: Upstream qBittorrent v5 dropped the insecure legacy
admin/adminadmindefault and creates an ephemeral temporary password on first boot. We opted to pre-seed a PBKDF2-SHA512 password hash directly intoqBittorrent.conf. This avoids fragile log scraping while enforcing strong authentication out of the box. - OCI Container Image Selection: Because the upstream repository compiles C++ / Qt binaries without shipping a root
Dockerfileorcompose.yml, we adoptedlscr.io/linuxserver/qbittorrent:latest(running qBittorrent v5.3.0 and WebAPI 2.16.2), which is the de-facto standard across Linux homelab environments. - Healthcheck Tolerance for HTTP 403: The Docker Compose healthcheck probes
/api/v2/app/versionand accepts either200or403. Anonymous API requests receive HTTP 403 once Web UI authentication is enabled, which reliably confirms the HTTP listener is operational without requiring hardcoded API session credentials in the compose definition. - Default Port Mappings: In compliance with pipeline specifications, host port
3000is mapped to container port8080for the Web UI. Peer traffic remains on standard port6881for both TCP and UDP. - Media and Privacy Considerations: All peer IP addresses captured in demonstration screenshots are blurred during presentation to safeguard third-party privacy, and legal Linux distribution installation ISOs (Ubuntu, Debian, Arch) were used as verification swarms.
Get the Unified Homelab Stack Compose Pack
One-command multi-container Compose files (Full *arr Stack, Prometheus + Grafana + ntfy Monitoring, and Homelab Auth) plus new verified deploys once a week.